How I Built a Guestbook Page using Supabase and Next.js

Hi, I'm Alex Kates 👋 I'm a product engineer currently working at Croissant as a Founding Engineer. I'm addicted to writing about building, and building things worth writing about. Some extracurriculars include AWS Community Builder Instructor at MIT xPRO Bootcamp Volunteer at Tech for Campaigns
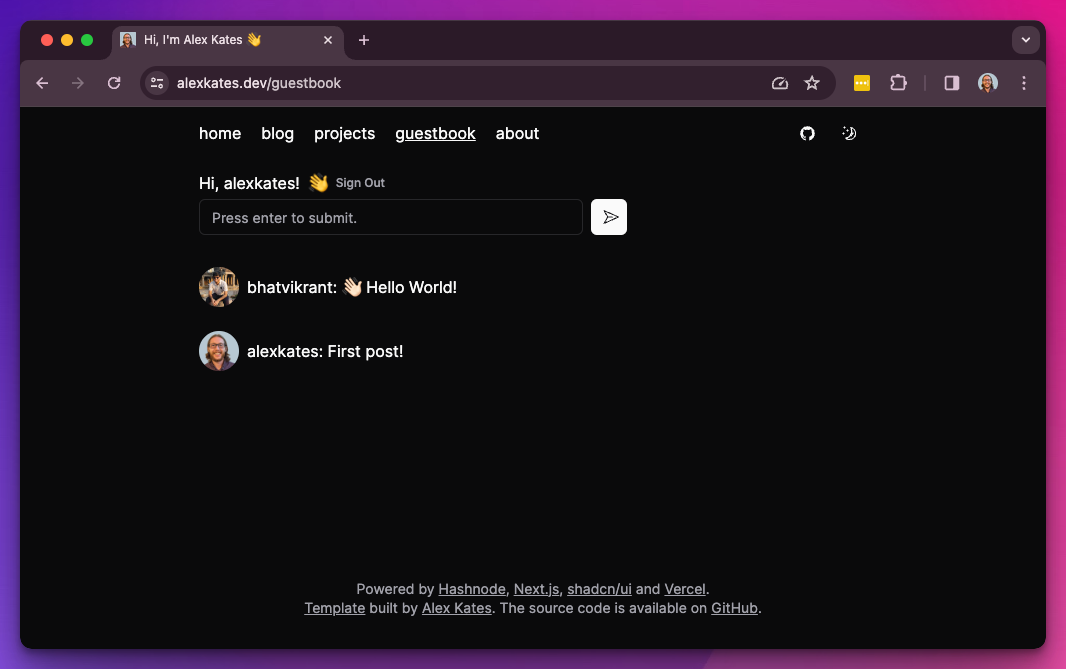
I've come across a fun website feature that has been appearing mainly on developers' personal sites: a Guestbook page where users can sign in and leave a message. This somewhat reminds me of the old Facebook wall from the 2000s which I admit I miss very much (remember pokes?). In this post, I'd like to discuss how I implemented a Guestbook page on my personal site https://alexkates.dev/guestbook using Supabase and Next.js.
Supabase
I've been a fan of Supabase for about a year now. This is my second project, the first being an open-source journaling app, Supajournal. This guestbook feature requires users to sign in and leave messages, making Supabase the perfect choice. In this section, we'll walk through setting up GitHub OAuth, a table with proper Row-Level Security (RLS), and generating TypeScript types.
GitHub OAuth
Supabase makes setting up OAuth quite simple, offering a variety of provider options. As I primarily write tech content, I decided to implement the guestbook feature using GitHub OAuth.
This setup will require you to have both your GitHub OAuth app and Supabase authentication settings open simultaneously. Essentially, we need to connect these two systems by configuring each within the other. Don't worry, we'll guide you through this process step by step.
First, navigate to https://database.new and create a new Supabase project. In my case, I named it alexkates-dev. Allow a few seconds for the project setup to complete.
Next, go to GitHub and log in. Click your avatar in the top-right corner, then click Settings -> Developer Settings -> OAuth Apps -> New OAuth App. Keep this tab open, as we'll need it shortly.
Now, return to Supabase and navigate to your new project's dashboard. From the left-hand menu, click Authentication -> Providers -> GitHub. Excellent! Keep this tab open as well. The upcoming steps will involve switching between Supabase and GitHub to set up both sides of the OAuth exchange.
Copy the Callback URL (for OAuth) value from Supabase. It should resemble something like https://yvcsamdilcryjsvbsct.supabase.co/auth/v1/callback. Return to GitHub and paste this value into the Authorization callback URL field. Additionally, while you're here, enter your Application Name and Homepage URL.
Now, click Generate a New Client Secret. Take note of your Client ID and Client Secret, then return to Supabase. Enter those values into the GitHub provider configuration located above the Callback URL from earlier, and click save.
The final step in Supabase is to navigate to URL Configuration and add a couple of Redirect URLs. I added two: http://localhost:3000/auth/callback and https://alexkates.dev/auth/callback. You should definitely add the localhost, but your production callback will vary depending on your domain.
Excellent! By now, your GitHub and Supabase Authentication systems should be set up and prepared for coding later on.
Guestbook Table
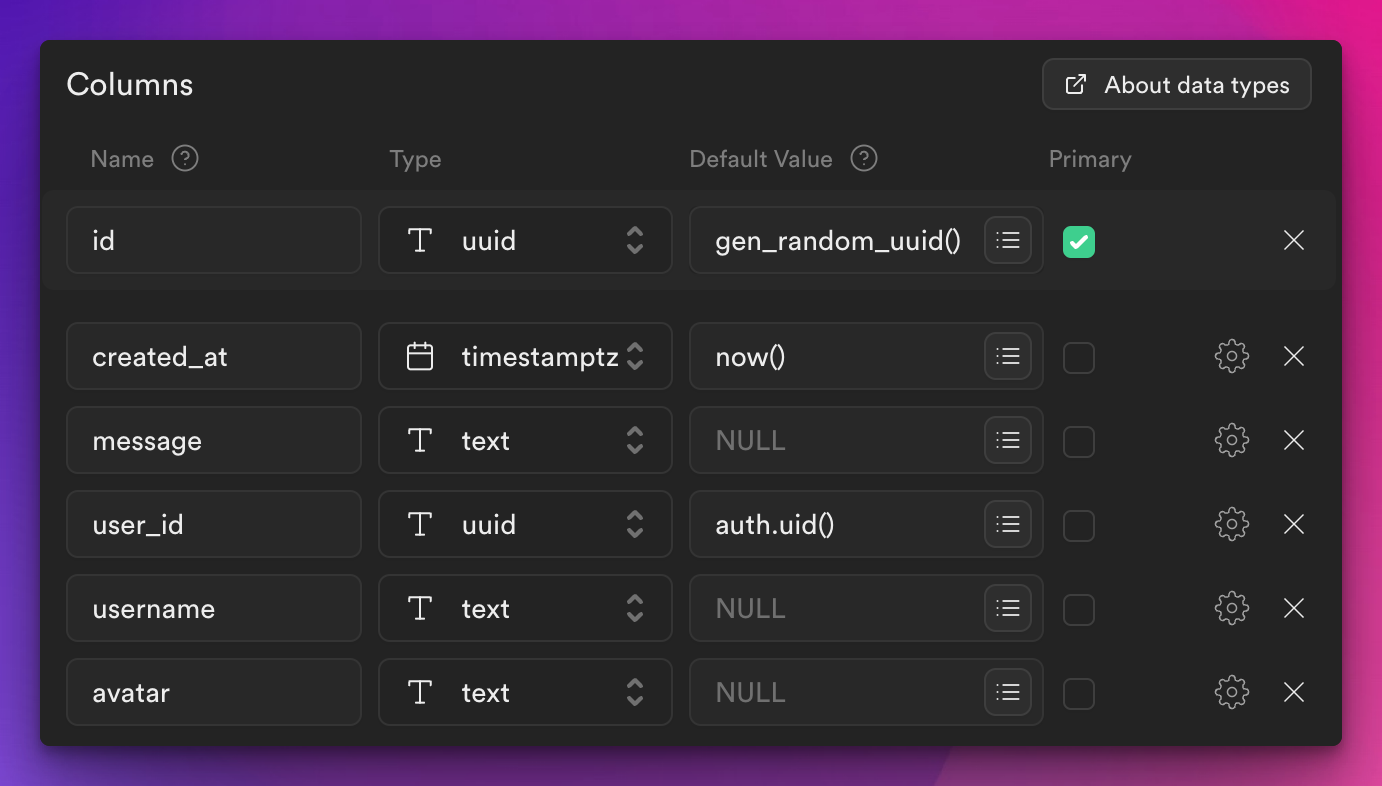
Once a user can sign in, they will need the ability to leave a message. I kept this part relatively simple by creating a single table called Guestbook with columns for the id, created_at, message, user_id, username, and avatar.
Next, we need to configure Row Level Security, or RLS. This is an impressive feature in Supabase that enables you to implement access control policies directly in your database. Head back to Authentication -> Policies where we will create two policies.
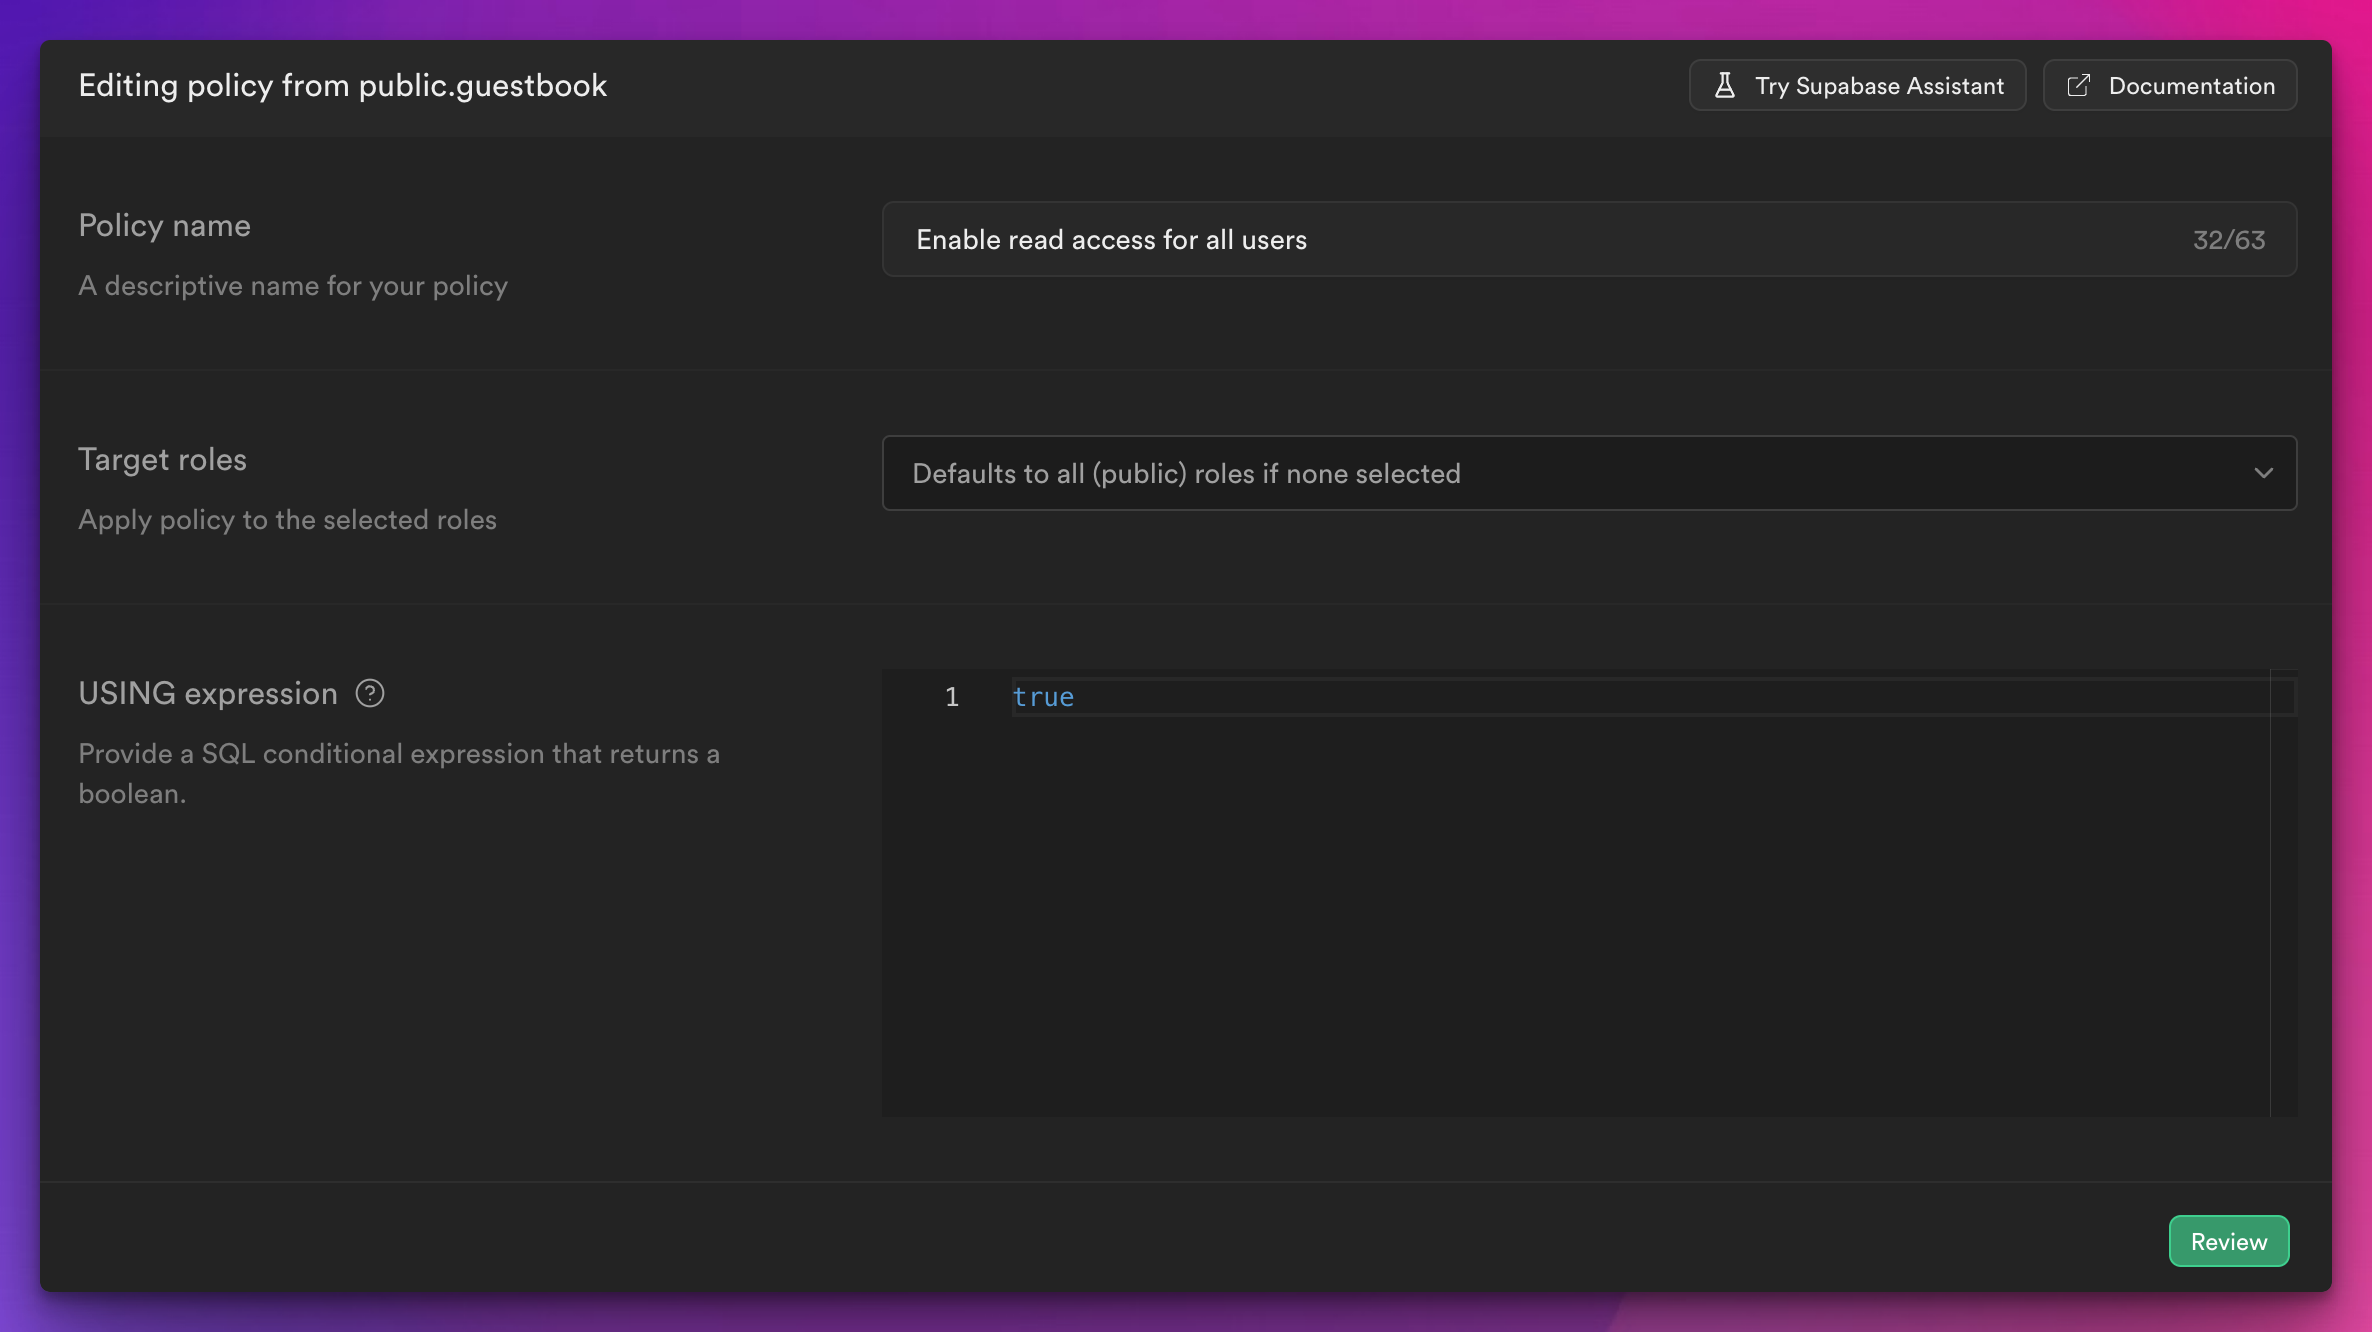
For a Guestbook feature, we have two access patterns. First, anonymous users need to be able to read messages left by others. Click New Policy -> Get started quickly, and we'll use the template called "Enable read access to everyone."
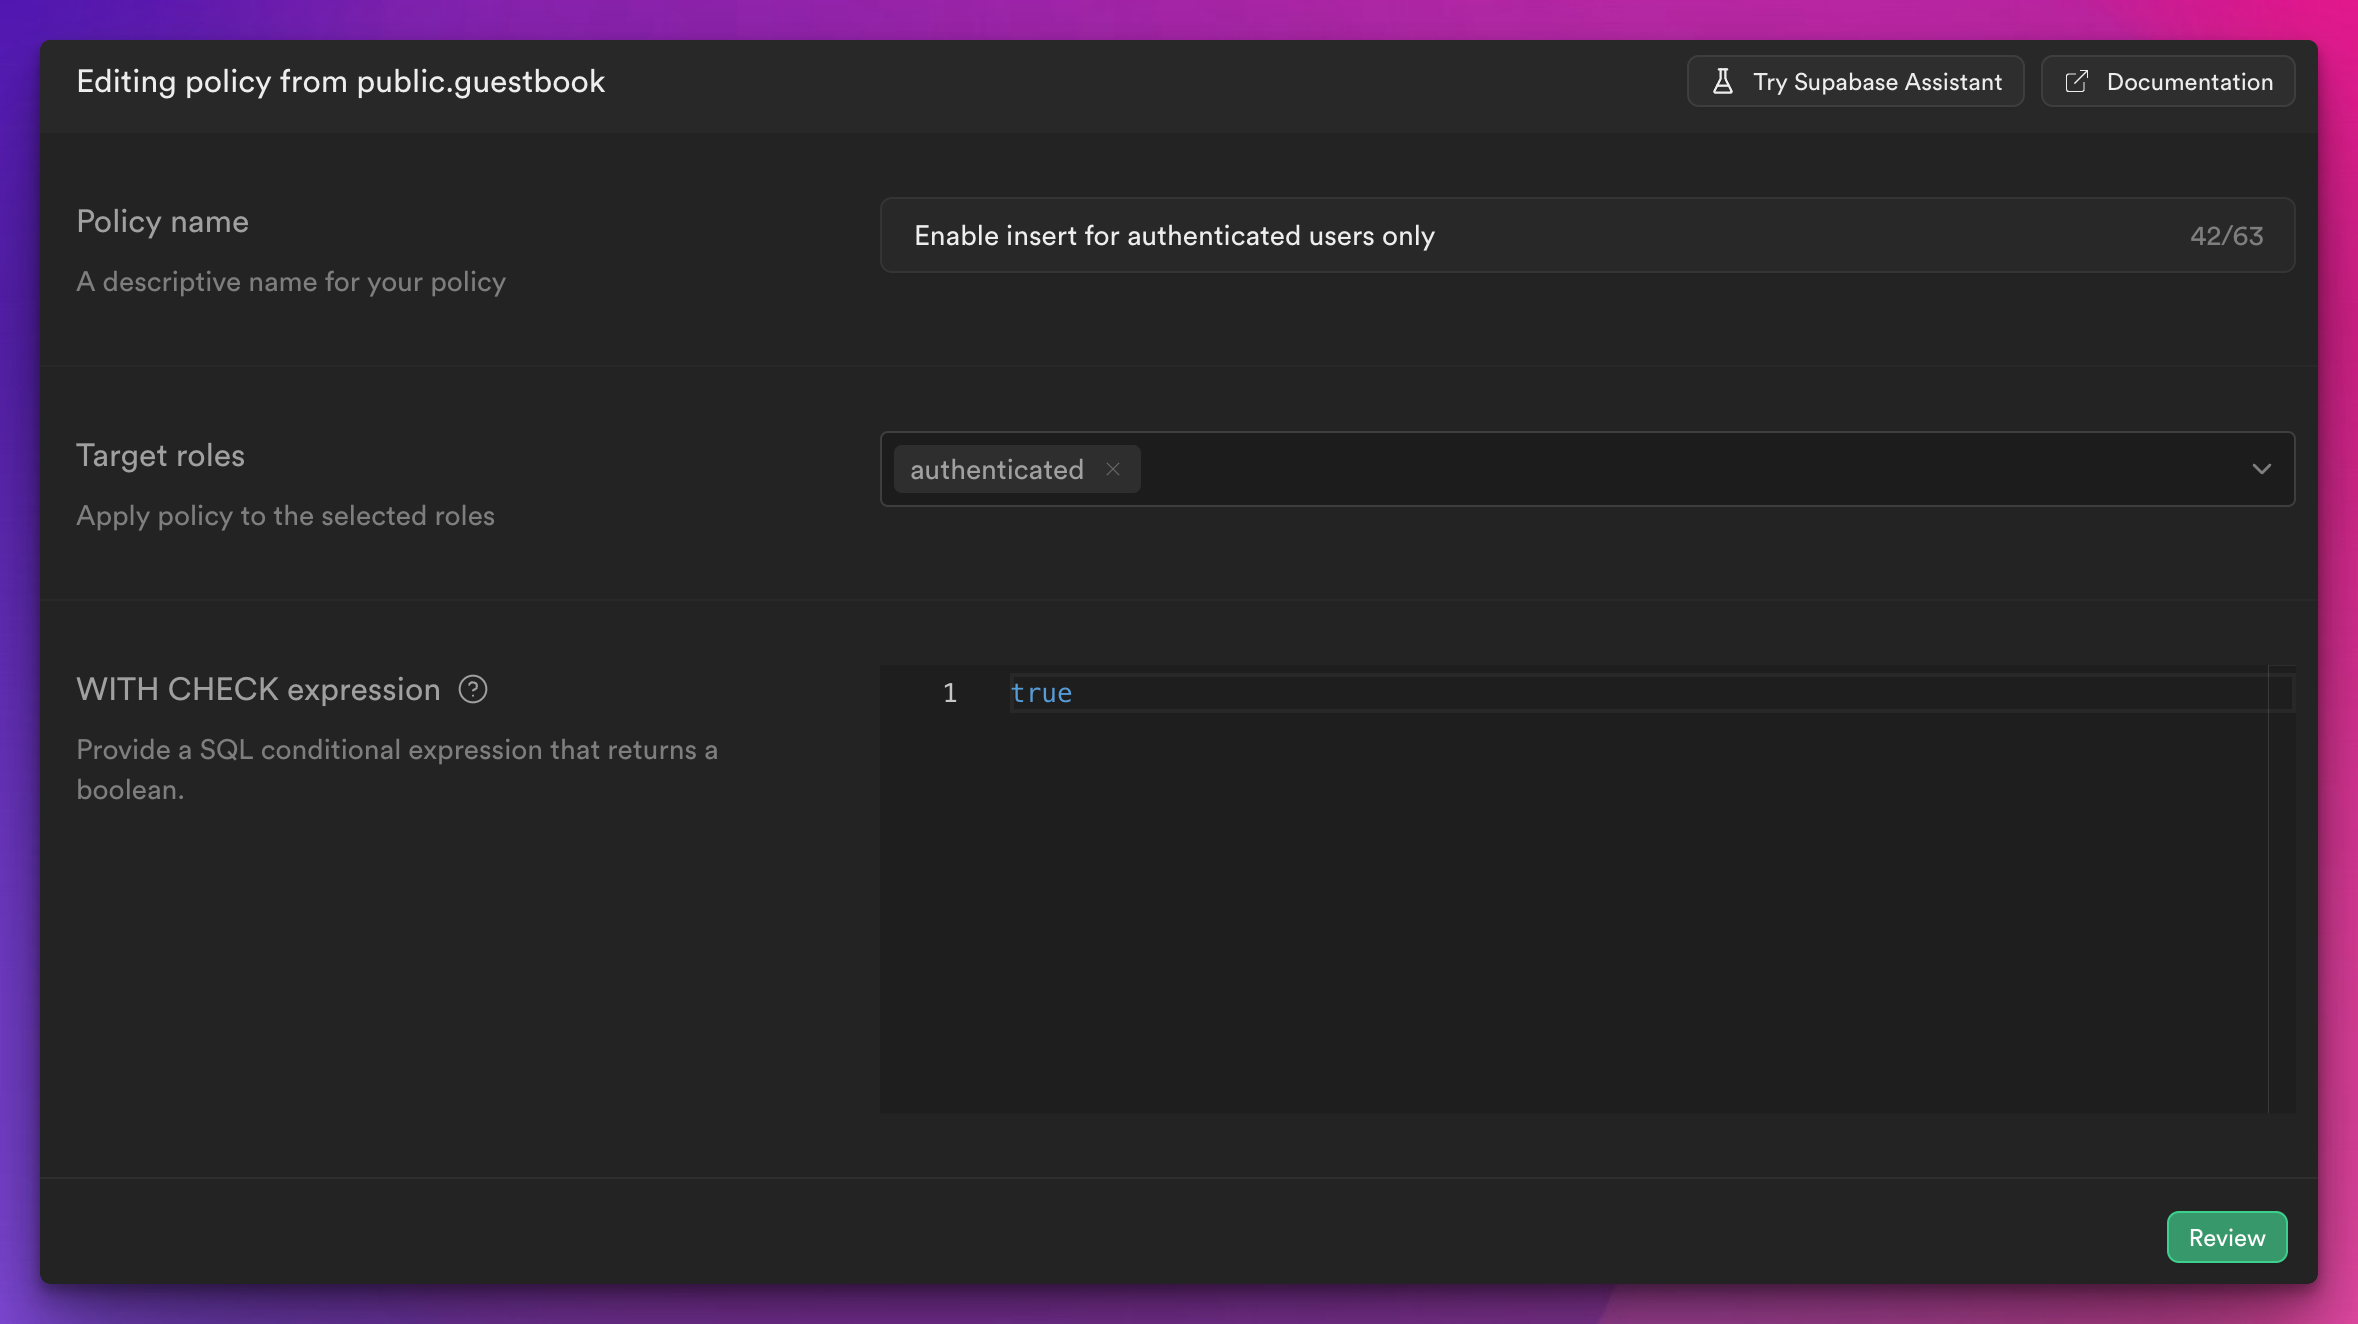
Next, an authenticated user needs to be able to leave a message. Once again, we'll use a pre-built template for this. Click New Policy -> Get started quickly, and this time, select the template called "Enable insert access for authenticated users only".
Excellent! By now, you should have Supabase authentication set up and a table called Guestbook with RLS configured for public read access and authenticated write access.
Next.js
I've been increasingly using Next.js 14, React Server Components, and Server Actions, and this Guestbook feature presented another perfect opportunity to use these newer features.
In this section, we'll walk through all the code changes you'll need to make to allow a user to view previous Guestbook messages, sign in with GitHub, and leave a new message.
I'm going to assume you already have a Next.js app. If you haven't created one yet, it's as simple as running pnpm dlx create-next-app@latest.
Project Setup
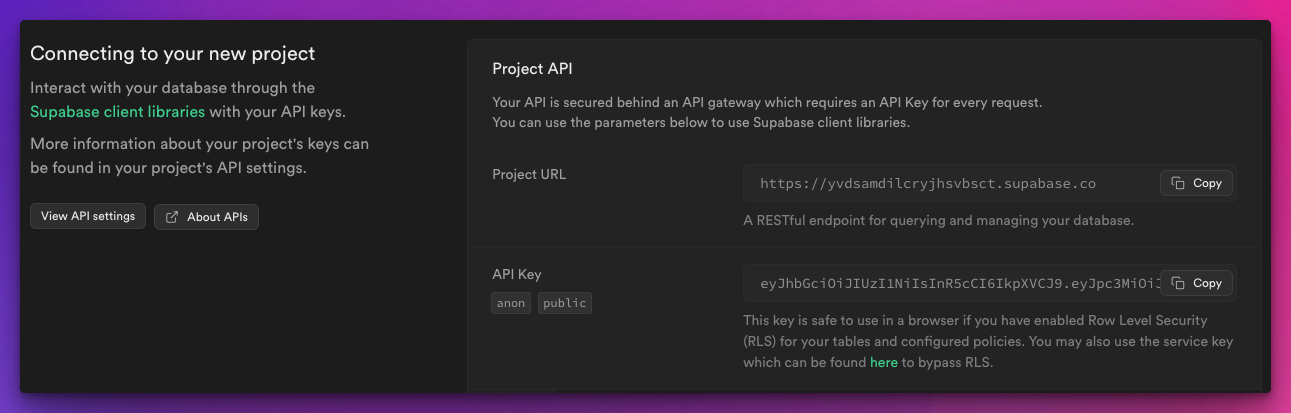
There are several initial setup steps required to make our Next.js app and Supabase work together. Let's begin with our .env.local file. We will need four environment variables to enable the Guestbook feature. These variables can be found in various locations within the Supabase dashboard.
NEXT_PUBLIC_SIGNIN_REDIRECT_URL="http://localhost:3000/auth/callback"
NEXT_PUBLIC_SUPABASE_ANON_KEY="eyJhbGci1iKIUzI1NiIsInR5cCI6IkpXVCJ9.eyJpc3MiOiJzdXBhYmFzZSIsInJlZiI6Inl2ZHNhbWRpbGNyeWpoc3Zic2N0Iiwicm9sZSI6ImFub24iLCJpYXQiOjE3MDgyNzkwMzIsImV4cCI6MjAyMzg1NTAzMn0.vHUHdPZ-npFD9zhnUIexdTw9rlYByDQQa1HW5RsKtZM"
NEXT_PUBLIC_SUPABASE_URL="https://yvdsamdilcryjhsvbsct.supabase.co"
SUPABASE_ACCESS_TOKEN="sbp_c83522caea12924355eb1270e4521850ac4d307a"
NEXT_PUBLIC_SIGNIN_REDIRECT_URL - We'll use this environment variable within our "Login with GitHub" call to Supabase, instructing GitHub where to redirect after successful authentication.
NEXT_PUBLIC_SUPABASE_ANON_KEY and NEXT_PUBLIC_SUPABASE_URL - these two values can be found in the Supabase dashboard. Note that they are marked as NEXT_PUBLIC and are perfectly safe to be exposed to client components.
SUPABASE_ACCESS_TOKEN - Unlike the ANON key, this access token is a secret and should not be exposed to client components. In fact, we will only use it as part of our build scripts to generate TypeScript files in the next step. To create one, go back to your Supabase project's main dashboard and, in the left navigation, click Account -> Access Tokens. Don't worry, I've already rotated my secret, so the one shared above is invalid.
TypeScript Generation
In this section, we'll discuss generating TypeScript files based on your Supabase schema. This is beneficial because it ensures your code always reflects the latest state of your database design, while allowing you to build these artifacts and add them to your .gitignore file.
There are three new package.json scripts we need to add, specifically predev, prebuild, and supabase-codegen.
"scripts": {
    "predev": "pnpm install && pnpm supabase-codegen",
    "dev": "next dev",
    "prebuild": "pnpm supabase-codegen",
    "build": "next build",
    "start": "next start",
    "lint": "next lint",
    "supabase-codegen": "supabase gen types typescript --project-id yvdsamdilcryjhsvbsct --schema public > src/supabase/types.ts"
  },
predev - This script runs before each pnpm dev command, ensuring that our packages and generated TypeScript are always up to date before starting the development server.
prebuild - Functions similarly to predev, but it ensures that the most recent TypeScript files are generated during the build process on Vercel.
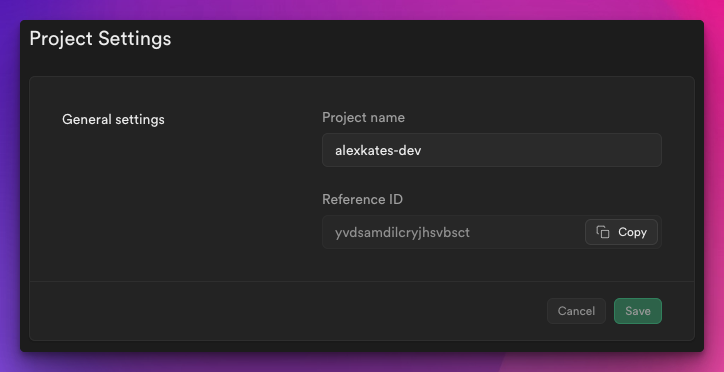
supabase-codegen - This is where the magic happens. This command instructs Supabase to generate TypeScript types based on a specific project-id. You can find this project id in the Supabase dashboard for your project. In the left navigation, click Project Settings -> General.
Great! Our Next.js environment variables are now set up. Next, we'll dive into some coding.
Supabase init
We need to run a one-time command to initialize Supabase. This command simply connects the Next.js app to the Supabase instance. Just run supabase init from the root of your Next.js app and follow the prompts. For more information, you can find the Supabase init documentation here.
This command will create a supabase directory at the root of your project. Personally, I prefer to have it inside the src directory, so I moved it. However, feel free to leave it where it is if you prefer. Once finished, your Supabase folder should resemble the following.
The final step is to add a line to the .gitignore file in the supabase directory. Include types.ts, as this is where we will store all of our generated types. In fact, you can now run the script from earlier, pnpm supabase-codegen, and your types.ts file will be created in your supabase directory.

Supabase Client Component
We'll be interacting with Supabase from both server and client components. The Supabase SSR library needs to be configured slightly differently depending on where we are using it. In this section, we'll create a couple of client factories to make this process easier moving forward.
Starting with the createBrowserClient factory which is a bit more straightforward as there are no cookies to manage.

This code ensures that we always obtain a version of the Supabase client compatible with client components. It utilizes the two NEXT_PUBLIC environment variables we set earlier: the public URL and the anonymous key. The client is also typed to the Database type generated from our codegen, providing autocomplete functionality when attempting to query later.
import { createBrowserClient } from "@supabase/ssr";
import { Database } from "./types";

export function createClient() {
  const { NEXT_PUBLIC_SUPABASE_URL, NEXT_PUBLIC_SUPABASE_ANON_KEY } = process.env;

  return createBrowserClient<Database>(NEXT_PUBLIC_SUPABASE_URL!, NEXT_PUBLIC_SUPABASE_ANON_KEY!);
}
Supabase Server Component
Our server client, which will be used in React Server Components, Server Actions, and middleware, is slightly more complex because it needs to manage the user's cookie state.
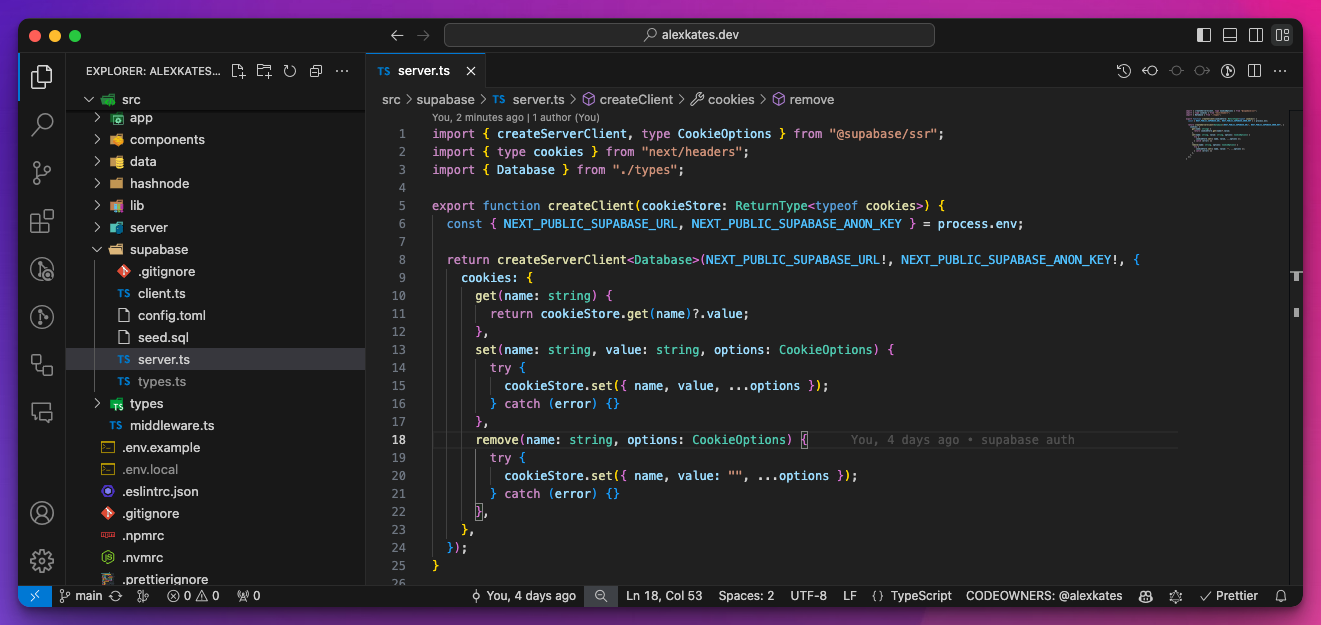
Similar to the client component, we are using the createServerClient factory function from @supabase/ssr. We also require the same environment variables as before. Finally, we need to configure "cookie methods." These methods determine how to get, set, and remove a cookie from the next/headers cookie store.
import { createServerClient, type CookieOptions } from "@supabase/ssr";
import { type cookies } from "next/headers";
import { Database } from "./types";

export function createClient(cookieStore: ReturnType<typeof cookies>) {
  const { NEXT_PUBLIC_SUPABASE_URL, NEXT_PUBLIC_SUPABASE_ANON_KEY } = process.env;

  return createServerClient<Database>(NEXT_PUBLIC_SUPABASE_URL!, NEXT_PUBLIC_SUPABASE_ANON_KEY!, {
    cookies: {
      get(name: string) {
        return cookieStore.get(name)?.value;
      },
      set(name: string, value: string, options: CookieOptions) {
        try {
          cookieStore.set({ name, value, ...options });
        } catch (error) {}
      },
      remove(name: string, options: CookieOptions) {
        try {
          cookieStore.set({ name, value: "", ...options });
        } catch (error) {}
      },
    },
  });
}
Middleware
Next, we need to add a middleware.ts file to the root of the Next.js project (or the src directory if you're using that, like me). This middleware performs several important tasks, but its primary responsibility is to intercept every request and ensure that the Supabase user cookie is up-to-date in the cookie store. It also calls supabase.auth.getUser(), which refreshes the user's access token if it has become stale. Finally, it includes a matcher that only applies when the route is /guestbook, as most of my site is public.
import { createServerClient, type CookieOptions } from "@supabase/ssr";
import { NextResponse, type NextRequest } from "next/server";

export async function middleware(request: NextRequest) {
  const { NEXT_PUBLIC_SUPABASE_URL, NEXT_PUBLIC_SUPABASE_ANON_KEY } = process.env;

  let response = NextResponse.next({
    request: {
      headers: request.headers,
    },
  });

  const supabase = createServerClient(NEXT_PUBLIC_SUPABASE_URL!, NEXT_PUBLIC_SUPABASE_ANON_KEY!, {
    cookies: {
      get(name: string) {
        return request.cookies.get(name)?.value;
      },
      set(name: string, value: string, options: CookieOptions) {
        request.cookies.set({
          name,
          value,
          ...options,
        });
        response = NextResponse.next({
          request: {
            headers: request.headers,
          },
        });
        response.cookies.set({
          name,
          value,
          ...options,
        });
      },
      remove(name: string, options: CookieOptions) {
        request.cookies.set({
          name,
          value: "",
          ...options,
        });
        response = NextResponse.next({
          request: {
            headers: request.headers,
          },
        });
        response.cookies.set({
          name,
          value: "",
          ...options,
        });
      },
    },
  });

  await supabase.auth.getUser();

  return response;
}

export const config = {
  matcher: ["/guestbook"],
};
app/guestbook/page.tsx
Let's start building the Guestbook page and components! First, we'll create the Next.js page.tsx file that serves as our Guestbook page. This React Server Component fetches the current authenticated user from Supabase and conditionally renders a page based on whether a user is signed in or not. This page also displays the <GuestbookList /> component and uses <Suspense /> to stream the list of guestbook entries to the client while the rest of the page loads instantly. If the user is not signed in yet, this page will display a client component called <SignInWithGithub /> that controls the OAuth flow with GitHub for us. Finally, if a user is signed in, this page will display a form, <GuestbookForm />, for the user to submit their message.
import GuestbookForm from "@/components/guestbook-form";
import GuestbookList from "@/components/guestbook-list";
import ParagraphSkeleton from "@/components/paragraph-skeleton";
import SignInWithGitHub from "@/components/sign-in-with-github";
import SignOut from "@/components/sign-out";
import { cn, fadeIn } from "@/lib/utils";
import { createClient } from "@/supabase/server";
import { cookies } from "next/headers";
import { Suspense } from "react";

export default async function Page({
  searchParams,
}: {
  searchParams?: {
    submitted?: boolean;
  };
}) {
  const supabaseClient = createClient(cookies());
  const {
    data: { user },
  } = await supabaseClient.auth.getUser();

  if (!user)
    return (
      <main className="flex flex-col gap-8">
        <section className={cn(fadeIn, "animation-delay-200 flex flex-col gap-2")}>
          Welcome to my guestbook!
          <div>
            <SignInWithGitHub />
          </div>
        </section>
        <section className={cn(fadeIn, "animation-delay-600")}>
          <Suspense fallback={<ParagraphSkeleton />}>
            <GuestbookList />
          </Suspense>
        </section>
      </main>
    );

  return (
    <main className="flex flex-col gap-8">
      <section className={cn(fadeIn, "animation-delay-200")}>
        <div className="flex items-center gap-2">
          Hi, {user.user_metadata.user_name}!<div className="animate animate-wave animation-delay-1000">👋</div>
          <SignOut />
        </div>
        {searchParams?.submitted ? <span>Your message has been submitted! Thanks for signing my guestbook.</span> : <GuestbookForm />}
      </section>
      <section className={cn(fadeIn, "animation-delay-600")}>
        <Suspense fallback={<ParagraphSkeleton />}>
          <GuestbookList />
        </Suspense>
      </section>
    </main>
  );
}
Observe how we import the createServer factory method from earlier and pass the cookies() from next/headers to it. This enables Supabase to maintain the user's state across pages, layouts, RSCs, and server actions.
<SignInWithGithub />
Supabase makes the actual code for OAuth flows quite straightforward. Remember that we already configured the OAuth exchanges earlier using the GitHub OAuth app we created and the Supabase Authentication section of our project.
Now, all that remains is to add this client component that will handle signing in with GitHub for us! You'll also notice the NEXT_PUBLIC_SIGNIN_REDIRECT_URL, which is used to inform GitHub where to redirect within our app once the user has completed the OAuth flow.
Unlike other instances, this time we are using the createClient factory for our browser client. This is because the OAuth flow is primarily a client-side process and must be initiated from the browser rather than on the server.
"use client";

import { createClient } from "@/supabase/client";
import { GitHubLogoIcon } from "@radix-ui/react-icons";
import { Button } from "./ui/button";

export default function SignInWithGitHub() {
  async function signInWithGitHub() {
    const supabase = createClient();
    supabase.auth.signInWithOAuth({
      provider: "github",
      options: {
        redirectTo: process.env.NEXT_PUBLIC_SIGNIN_REDIRECT_URL,
      },
    });
  }

  return (
    <Button onClick={signInWithGitHub}>
      <GitHubLogoIcon className="mr-2" />
      Sign in with GitHub
    </Button>
  );
}
<GuestbookList />
Next up is our GuestbookList component, which is also a server component. It's responsible for fetching the complete list of guestbook entries from our Supabase table and mapping each to the JSX that will be used to display the message. Once again, we use the Supabase server client, but this time we use it to actually run a SQL query, simply selecting all from the guestbook table.
After obtaining the guestbook entries, we sort them in descending order by created_at and map each to some JSX that resembles a text message component. If it wasn't already clear, I'm using shadcn/ui for the majority of the UI, which is also where the Avatar components come from.
import { createClient } from "@/supabase/server";
import { cookies } from "next/headers";
import { Avatar, AvatarFallback, AvatarImage } from "./ui/avatar";

export default async function GuestbookList() {
  const supabaseClient = createClient(cookies());
  const { data } = await supabaseClient.from("guestbook").select("*");

  return (
    <ul className="flex flex-col gap-6">
      {data
        ?.sort((a, b) => new Date(b.created_at).getTime() - new Date(a.created_at).getTime())
        ?.map((message) => (
          <li key={message.id} className="flex items-center gap-2">
            <Avatar>
              <AvatarImage src={message.avatar} alt={message.username} />
              <AvatarFallback>{message.username.substring(0, 2)}</AvatarFallback>
            </Avatar>
            {message.username}: {message.message}
          </li>
        ))}
    </ul>
  );
}
<GuestbookForm />
In my opinion, Next.js server actions have greatly simplified the process of submitting data to a server. There's no longer a need to create an API route and manage client-side state for submission. The GuestbookForm component consists of a form, text input, and a button to submit the form. The form submission action is a Server Action that writes directly to our guestbook table.
import submitGuestbookMessage from "@/server/submit-guestbook-message";
import SubmitGuestbookMessageButton from "./submit-guestbook-message-button";
import { Input } from "./ui/input";

export default function GuestbookForm() {
  return (
    <form action={submitGuestbookMessage} className="flex flex-col gap-4">
      <div className="flex gap-2 items-center">
        <Input className="max-w-sm" id="message" name="message" required placeholder="Press enter to submit." />
        <SubmitGuestbookMessageButton />
      </div>
    </form>
  );
}
There are some interesting features within the <SubmitGuestbookMessageButton /> component. This client component utilizes the new useFormStatus hook from the latest react-dom release. This enables us to conditionally render content based on whether the form is pending submission or not.
"use client";

import { PaperPlaneIcon, ReloadIcon } from "@radix-ui/react-icons";
import { useFormStatus } from "react-dom";
import { Button } from "./ui/button";

function SubmitGuestbookMessageButton() {
  const { pending } = useFormStatus();

  return (
    <Button variant="default" disabled={pending} size="icon">
      {!pending ? <PaperPlaneIcon className="pl-1 h-5 w-5" /> : <ReloadIcon className="pl-1 h-5 w-5 animate-spin" />}
    </Button>
  );
}

export default SubmitGuestbookMessageButton;
<SignOut />
Finally, the <SignOut /> component enables users to sign out of our app if they wish. This client component utilizes the Supabase browser client to invoke the auth.signOut() function.
"use client";

import { createClient } from "@/supabase/client";
import { useRouter } from "next/navigation";
import { Button } from "./ui/button";

export default function SignOut() {
  const router = useRouter();

  async function signOut() {
    const supabase = createClient();
    await supabase.auth.signOut();

    router.refresh();
  }

  return (
    <Button onClick={signOut} size="sm" variant="link" className="p-0 text-muted-foreground">
      Sign Out
    </Button>
  );
}
Outro
I truly enjoyed building the Guestbook page on my personal site using Next.js and Supabase. The new tools in Next.js 14, such as React Server Components, Server Actions, and the app router, combined with the power of Supabase auth and the @supabase/ssr library, made this a fun project to work through.
If you found this helpful, I have a couple other free to use tools over at alexkates.dev/projects and also consider connecting on Twitter.